逆向探索微信聊天界面的 UI 实现逻辑
· Skill
背景
工作中自己负责IM功能的开发,平时对微信进行了不少研究学习。 这篇文章主要关注微信iOS客户端界面实现中的“聊天消息界面”实现。
写这篇文章的目的:
- 分享微信的聊天界面实现方式。
- 展示逆向主要流程。
PS: 最初是为了解决项目中的一个小问题才逆向的微信。
准备
设备:iPhone5 iOS 8.4 越狱
usbmuxd
➜  python-client python tcprelay.py -t 22:2222
Forwarding local port 2222 to remote port 22
......
ssh
ssh root@localhost -p 2222
找到可执行文件:
everettjfs-iPhone:~ root# ps aux | grep /App
mobile   38363   4.4  8.5   776400  88748   ??  Ss    8:55PM   0:52.96 /var/mobile/Containers/Bundle/Application/25FB096A-8122-49B5-9304-5FDB9080D9B0/WeChat.app/WeChat
沙盒路径:
everettjfs-iPhone:~ root# cycript -p WeChat
cy# [[NSFileManager defaultManager] URLsForDirectory:NSDocumentDirectory inDomains:NSUserDomainMask]
@[#"file:///var/mobile/Containers/Data/Application/F36BD1C1-1C39-4C83-AD4B-6D9F2B976330/Documents/"]
砸壳:
everettjfs-iPhone:~ root# clutch -i
everettjfs-iPhone:~ root# clutch -b com.tencent.xin
Finished dumping com.tencent.xin to /var/tmp/clutch/5F6CA026-C176-4FB0-9569-90F2DD251385
导出头文件:
这里不用class-dump-z 是因为class-dump-z会无法识别UIKit的很多类。
[everettjf@e w ]$ class-dump -s -S -H WeChat -o headers
初步窥探
定位Controller
打开微信,进入和某个人的会话(也就是这篇文章要研究的“聊天消息界面”)
everettjfs-iPhone:~ root# cycript -p WeChat
cy# [[[UIWindow keyWindow] rootViewController] _printHierarchy].toString()
<MMTabBarController 0x18265240>, state: appeared, view: <UILayoutContainerView 0x18265ac0>
   | <MMUINavigationController 0x1800f230>, state: appeared, view: <UILayoutContainerView 0x180cd0e0>
   |    | <NewMainFrameViewController 0x179a2400>, state: disappeared, view: <MMUIHookView 0x1827f980> not in the window
   |    | <BaseMsgContentViewController 0x179b3800>, state: appeared, view: <UIView 0x16e36c30>
   | <MMUINavigationController 0x181a40a0>, state: disappeared, view: <UILayoutContainerView 0x181a4400> not in the window
   |    | <ContactsViewController 0x17162800>, state: disappeared, view:  (view not loaded)
   | <MMUINavigationController 0x181adb10>, state: disappeared, view: <UILayoutContainerView 0x181ade00> not in the window
   |    | <FindFriendEntryViewController 0x179aec00>, state: disappeared, view:  (view not loaded)
   | <MMUINavigationController 0x18003e00>, state: disappeared, view: <UILayoutContainerView 0x18008cc0> not in the window
   |    | <MoreViewController 0x179ad400>, state: disappeared, view:  (view not loaded)
微信主界面是个MMTabBarController,有四个TabBarItem,分别对应一个MMUINavigationController。对应的RootViewController如下:
- 微信 NewMainFrameViewController
- 通讯录 ContactsViewController
- 发现 FindFriendEntryViewController
- 我 MoreViewController
此次我们关注的“聊天消息界面”,就是BaseMsgContentViewController (state:appeared)。
观察Views
Reveal
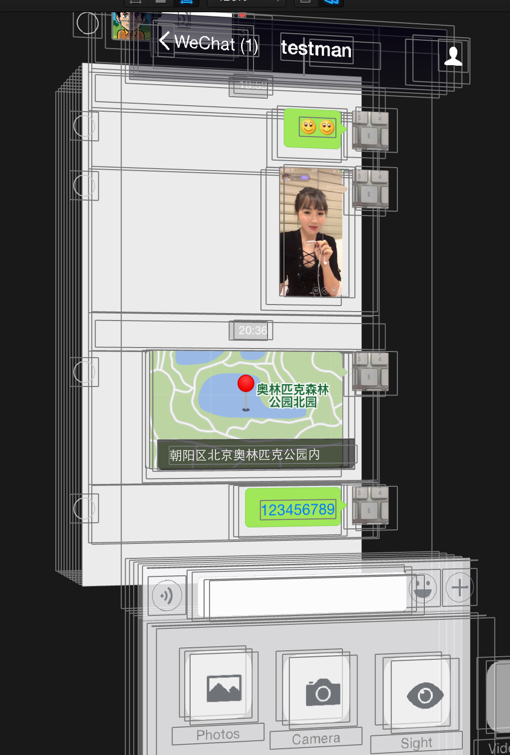
界面中各种类型的消息都发送一下,这里先发送:文本、图片、位置、语音。 使用Reveal观察,如下图:
MMTableView
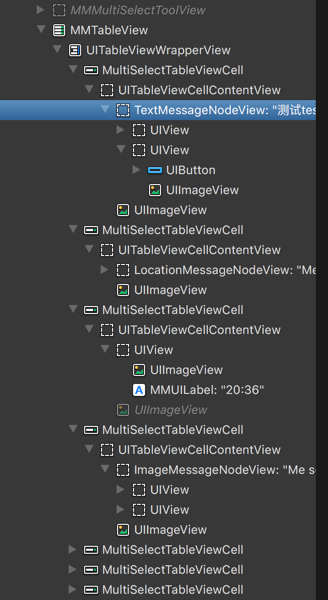
从这两张图可以看到:
整个消息列表本质上是个 MMTableView (这个我们自己实现一般也是这么做)。从class-dump出的头文件中可知道,MMTableView是UITableView的子类。
@interface MMTableView : UITableView <MMDelegateCenterExt>
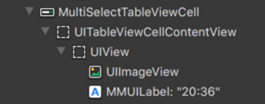
TableView的Cell只有一种类型, MultiSelectTableViewCell。这里开始看到时,很让我好奇。为什么没有采用传统的一个消息一个Cell的方式呢
@interface MultiSelectTableViewCell : UITableViewCell
MessageNodeView
Cell都是MultiSelectTableViewCell,而区分不同消息的是contentView的内容。
- 文本消息 : TextMessageNodeView
- 图像消息: ImageMessageNodeView
- 位置消息:LocationMessageNodeView
- 语音消息:VocieMessageNodeView (上面的截图看不到)
此外,消息之间的时间,也是MultiSelectTableViewCell,只是contentView是关于时间的Label。
简单总结
弄明白消息UI的基本结构,下一步就是找到如何创建这些MessageNodeView。这里很容易有个疑问,所有消息都是MultiSelectTableViewCell,那如何实现的Cell重用呢? 继续探索。
观察Controller
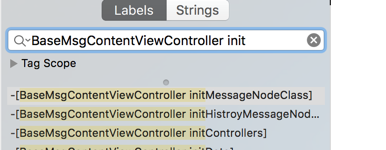
在class-dump出的头文件中找到 BaseMsgContentViewController类。可以找到 BaseMsgContentViewController.h文件,这个头文件有614行,可见这个类的复杂。(估计微信开发早期并没有考虑到后期的大量需求加入,于是成了今天的Massive View Controller)
这里细化此次行动的目的:想知道聊天中的每一条消息是如何创建、显示的。
观察类的实现,发现一些相关变量和方法:
// 字面上看,应该就是存储MessageNode的数组
NSMutableArray *m_arrMessageNodeData;
// 应该是存储所有支持的MessageNode Class类型
struct vector<Class, std::__1::allocator<Class>> m_messageNodeClass;
// 这就是主要是TableView
MMTableView *m_tableView;

// 预创建消息,有意思,一会儿仔细研究研究
- (void)preCreateMessageContentNode:(id)arg1;
- (void)preCreateMessageSplitNode:(id)arg1;
- (void)preCreateMessageTimeNode:(id)arg1;

// 初始化Class
- (void)initMessageNodeClass;
- (id)newMessageNodeViewForMessageWrap:(id)arg1 contact:(id)arg2 chatContact:(id)arg3;


// 获取node数目
- (unsigned int)getMsgNodeCount;
// 获取指定索引的node
- (id)getNodeDataByIndex:(unsigned int)arg1;
// 获取消息node数组
- (id)GetMessageNodeDataArray;

// 添加
- (void)addMessageNode:(id)arg1 layout:(BOOL)arg2 addMoreMsg:(BOOL)arg3;
- (void)addReceiveMessageNode:(id)arg1;
- (id)addSplitNode:(id)arg1 addMoreMsg:(BOOL)arg2;
- (void)addTimeNode:(id)arg1 layout:(BOOL)arg2 addMoreMsg:(BOOL)arg3;
// 移除
- (void)removeAllObjectsFromMessageNodeDatas;
- (void)removeObjectsFromMessageNodeDatas:(id)arg1;
// 更新
- (void)updateMessageNodeImageLoadingPercent:(unsigned long)arg1 percent:(unsigned long)arg2;
- (void)updateMessageNodeStatus:(id)arg1;
- (void)updateMessageNodeViewForOrientation:(id)arg1;

// 一些NodeView的事件
- (void)tagLink:(id)arg1 messageWrap:(id)arg2;
- (void)tapAppNodeView:(id)arg1;
- (void)tapFriendCard_NodeView:(id)arg1 WithContact:(id)arg2 WithMsg:(id)arg3;
- (void)tapImage_NodeView:(id)arg1;
- (void)tapLocation_NodeView:(id)arg1;
- (void)tapPushContact_NodeView:(id)arg1;
- (void)tapPushMail_NodeView:(id)arg1 withPushMailWrap:(id)arg2;
- (void)tapReader_NodeView:(id)arg1;
- (void)tapStatus_NodeView:(id)arg1;
- (void)tapText_NodeView:(id)arg1;
- (void)tapVideoStatus_NodeView:(id)arg1;
NSMutableArray *m_arrMessageNodeData;
cycript 打印出来
cy# v = #0x15067600
#"<BaseMsgContentViewController: 0x15067600>"
cy# v->m_arrMessageNodeData
@[#"<CMessageNodeData: 0x15b95260>",#"<CMessageNodeData: 0x15adf260>",#"<CMessageNodeData: 0x15a4abb0>",#"<CMessageNodeData: 0x1580f190>",#"<CMessageNodeData: 0x15a49930>",#"<CMessageNodeData: 0x1589b8a0>",#"<CMessageNodeData: 0x15a41410>",#"<CMessageNodeData: 0x158783e0>",#"<CMessageNodeData: 0x15a4a3b0>",#"<CMessageNodeData: 0x15aa14f0>",#"<CMessageNodeData: 0x1475ce50>",#"<CMessageNodeData: 0x15bf9960>",#"<CMessageNodeData: 0x15b53f40>",#"<CMessageNodeData: 0x147ad9f0>",#"<CMessageNodeData: 0x15b6d240>",#"<CMessageNodeData: 0x15ba04b0>",#"<CMessageNodeData: 0x15b90050>",#"<CMessageNodeData: 0x15be7ba0>",#"<CMessageNodeData: 0x15b84eb0>"]
cy# v->m_arrMessageNodeData.count
19
前提,与对方的聊天消息已经有很多条,首次打开与对方的聊天消息界面,可以看到微信默认只加载19条消息。
CMessageNodeData是什么?
@interface CMessageNodeData : NSObject
{
    int m_eMsgNodeType;
    CMessageWrap *m_msgWrap;
    UIView *m_view;
    unsigned long m_uCreateTime;
}
注意,这里有个UIView
@interface CMessageWrap : MMObject <IAppMsgPathMgr, ISysNewXmlMsgExtendOperation, IMsgExtendOperation, NSCopying>
{
    BOOL m_bIsSplit;
    BOOL m_bNew;
    unsigned long m_uiMesLocalID;
    long long m_n64MesSvrID;
    NSString *m_nsFromUsr;
    NSString *m_nsToUsr;
    unsigned long m_uiMessageType;
    NSString *m_nsContent;
    unsigned long m_uiStatus;
    unsigned long m_uiImgStatus;
    //.............省略大量字段.............
CMessageWrap自然就是对消息数据的封装。
CMessageNodeData有个UIView *m_view的变量,看看是什么:
y# d = v->m_arrMessageNodeData
@[#"<CMessageNodeData: 0x15b95260>",#"<CMessageNodeData: 0x15adf260>",#"<CMessageNodeData: 0x15a4abb0>",#"<CMessageNodeData: 0x1580f190>",#"
.....省略....
cy# var x = []; for(var i = 0; i < d.count;i++) x.push([d objectAtIndex:i].m_view); x
[#"<UIView: 0x1592f9c0; frame = (0 10; 320 28); layer = <CALayer: 0x147e6cc0>>",#"<TextMessageNodeView: 0x1582cca0; frame = (251 0; 60 59); layer = <CALayer: 0x158b1350>>",#"<TextMessageNodeView: 0x15a58d60; frame = (251 0; 60 59); layer = <CALayer: 0x15a3cdf0>>",#"<TextMessageNodeView: 0x15a3ba10; frame = (251 0; 60 59); layer = <CALayer: 0x15ab9ab0>>",#"<TextMessageNodeView: 0x15a31610; frame = (251 0; 60 59); layer = <CALayer: 0x15a31760>>",#"<TextMessageNodeView: 0x15a57dc0; frame = (251 0; 60 59); layer = <CALayer: 0x15a547b0
.....省略.......
odeView: 0x159ee260; frame = (186 0; 125 59); layer = <CALayer: 0x159ee3b0>>",#"<ImageMessageNodeView: 0x15b91cd0; frame = (179.5 0; 131.5 150); layer = <CALayer: 0x15b6e8e0>>",#"<UIView: 0x15b675d0; frame = (0 10; 320 28); layer = <CALayer: 0x15be5fa0>>",#"<LocationMessageNodeView: 0x15bdaee0; frame = (50 0; 261 139); layer = <CALayer: 0x15b7d290>>",#"<TextMessageNodeView: 0x15bbf400; frame = (144 0; 167 59); layer = <CALayer: 0x15be6770>>"]
可见,m_view就是MultiSelectTableViewCell的contentView下的那个UIView。
这里又有疑问:屏幕上显示的Cell其实就4个,为什么这些 CMessageNodeData中的m_view都有值(不是nil),难道没有实现重用?是的,目前我发现,确实没有实现重用。
为验证,我随便发送了几百条各种消息,再输出所有的m_view。
 cy# d.count
419
cy# var x = []; for(var i = 0; i < d.count;i++) x.push([d objectAtIndex:i].m_view); x
[#"<UIView: 0x15c91540; frame = (0 10; 320 28); layer = <CALayer: 0x16096bb0>>",#"<AppUrlMessageNodeView: 0x160977e0; frame = (0 0; 327 149); layer = <CALayer: 0x16098f50>>",#"<UIView: 0x16098d70; frame = (0 10; 320 28); layer = <CALayer: 0x16099bd0>>",#"<ImageMessageNodeView: 0x1609b000; frame = (179.5 0; 131.5 150); layer = <CALayer: 0x1609a840>>",#"<ImageMessageNodeView: 0x160a3d80; frame = (
// ........省略..................
cy# x.length
419
好吧,果然419个m_view都不是nil。
我的天呐,这怎么能行。不过观察下内存占用,以及再仔细想想,这种方案还是可以接受的。详细见下文。
我想到的原因如下:
- 内存占用并不会太多(具体数据见下文)。
- 聊天界面出现太多m_view的情形并不多。且出现时由于内存占用可接受,就无所谓了。
struct vector<Class, std::__1::allocator> m_messageNodeClass;
这里能看出BaseMsgContentViewController的实现文件是 BaseMsgContentViewController.mm,也就是Objective C++写的。
m_messageNodeClass与下面的方法有关:
- (void)initMessageNodeClass;
使用Hopper反编译WeChat的二进制文件:
再反汇编为c代码:
void -[BaseMsgContentViewController initMessageNodeClass](void * self, void * _cmd) {
    r7 = &arg_C;
    sp = sp - 0xb4;
    r11 = self;
    r6 = *objc_ivar_offset_BaseMsgContentViewController_m_messageNodeClass;
    r5 = *(r11 + r6);
    r0 = *(r11 + 0xa4);
    if (r0 != r5) {
            do {
                    *(r11 + 0xa4) = r0 - 0x4;
                    r0 = *(r0 + 0xfffffffffffffffc);
                    [r0 release];
                    r0 = *(r11 + 0xa4);
            } while (r0 != r5);
            r6 = *objc_ivar_offset_BaseMsgContentViewController_m_messageNodeClass;
    }
    r8 = @selector(class);
    r0 = [MultiColumnReaderMessageNodeView class];
    r7 = r7;
    r0 = [r0 retain];
    r1 = r6 + 0x4;
    arg_B0 = r0;
    r2 = r6 + r11;
    r3 = *(r11 + r1);
    if (r3 < *(r2 + 0x8)) {
            arg_B0 = 0x0;
            *r3 = r0;
            *(r11 + r1) = *(r11 + r1) + 0x4;
    }
    else {
            void std::__1::vector<objc_class* __strong, std::__1::allocator<objc_class* __strong> >::__push_back_slow_path<objc_class* __strong>();
            [arg_B0 release];
    }
    r4 = *objc_ivar_offset_BaseMsgContentViewController_m_messageNodeClass;
    r0 = [ImageTextReaderMessageNodeView class];
	//.....省略......
就是把所有支持的MessageNode的Class都push_back到这个vector中。
这里能看到微信支持的所有可显示的消息类型
手动整理伪代码如下:
std::vector<Class> m_messageNodeClass;
m_messageNodeClass.push_back([MultiColumnReaderMessageNodeView class]);
m_messageNodeClass.push_back([ImageTextReaderMessageNodeView class]);
m_messageNodeClass.push_back([HeadImgReaderMessageNodeaView class]);
m_messageNodeClass.push_back([MessageSysNodeView class]);
m_messageNodeClass.push_back([AttributedReaderMessageNodeaView class]);
m_messageNodeClass.push_back([ReaderNewMessageNodeView class]);
m_messageNodeClass.push_back([MultiReaderMessageNodeView class]);
m_messageNodeClass.push_back([MailMessageNodeView class]);
m_messageNodeClass.push_back([MassSendMessageNodeView class]);
m_messageNodeClass.push_back([ImageMessageNodeView class]);
m_messageNodeClass.push_back([VoiceMessageNodeView class]);
m_messageNodeClass.push_back([ShortVideoMessageNodeView class]);
m_messageNodeClass.push_back([VideoMessageNodeView class]);
m_messageNodeClass.push_back([ShareCardMessageNodeView class]);
m_messageNodeClass.push_back([EmoticonMessageNodeView class]);
m_messageNodeClass.push_back([GameMessageNodeView class]);
m_messageNodeClass.push_back([VoipContentNodeView class]);
m_messageNodeClass.push_back([AppTextMessageNodeView class]);
m_messageNodeClass.push_back([AppImageMessageNodeView class]);
m_messageNodeClass.push_back([AppEmoticonMessageNodeView class]);
m_messageNodeClass.push_back([AppFileMessageNodeView class]);
m_messageNodeClass.push_back([AppUrlMessageNodeView class]);
m_messageNodeClass.push_back([AppShakeMessageNodeView class]);
m_messageNodeClass.push_back([VoiceReminderConfirmNodeView class]);
m_messageNodeClass.push_back([VoiceReminderRemindNodeView class]);
m_messageNodeClass.push_back([AppProductMessageNodeView class]);
m_messageNodeClass.push_back([AppEmoticonSharedMessageNodeView class]);
m_messageNodeClass.push_back([AppWCProductMessageNodeView class]);
m_messageNodeClass.push_back([AppWCCardMessageNodeView class]);
m_messageNodeClass.push_back([AppTVMessageNodeView class]);
m_messageNodeClass.push_back([AppTrackRoomMessageNodeView class]);
m_messageNodeClass.push_back([AppRecordMessageNodeView class]);
m_messageNodeClass.push_back([AppNoteMessageNodeView class]);
m_messageNodeClass.push_back([AppHardWareRankMessageNode class]);
m_messageNodeClass.push_back([AppHardWareLikeNotifyMessageNode class]);
m_messageNodeClass.push_back([MultiTalkMessageNodeView class]);
m_messageNodeClass.push_back([WCPayTransferMessageNodeView class]);
m_messageNodeClass.push_back([WCPayTransferAcceptedMessageNodeView class]);
m_messageNodeClass.push_back([WCPayTransferRejectedMessageNodeView class]);
m_messageNodeClass.push_back([WCPayMessageBaseNodeView class]);
m_messageNodeClass.push_back([WCPayC2CMessageNodeView class]);
m_messageNodeClass.push_back([WCPayC2CFestivalMsgNodeView class]);
m_messageNodeClass.push_back([AppDefaultMessageNodeView class]);
m_messageNodeClass.push_back([TextMessageNodeView class]);
可见,微信真实个巨大的工程,支持的消息类型这么多(我使用的微信版本:6.3.19)。
随便看个消息,例如: MessageSysNodeView 继承自 BaseMessageNodeView 然后 MMUIView
- (void) preCreateMessageXXXXNode
- (void)preCreateMessageContentNode:(id)arg1;
- (void)preCreateMessageSplitNode:(id)arg1;
- (void)preCreateMessageTimeNode:(id)arg1;
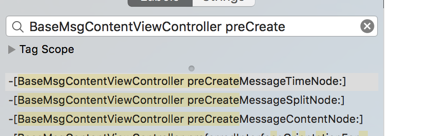
由这三个preCreateMessage开头的方法,可猜测到 MultiSelectTableViewCell的contentView的第一层子View 存在三类:
- 具体内容ContentNode
- 分隔符Node
- 时间Node
Hopper反汇编找到对应代码:
TimeNode
为循序渐进,先研究下TimeNode的preCreate:
由于内部有取arg2.m_view的代码,能基本猜到 arg2是 CMessageNodeData类型。(后面可以用lldb证实)
关键代码行及伪代码大概如下:
void -[BaseMsgContentViewController preCreateMessageTimeNode:](void * self, void * _cmd, void * arg2) {
messageNodeData = arg2
if(messageNodeData.m_view == nil){
	// 就是填充m_view

	// 从MMThemeManager获取时间Node的高度
    r5 = [[MMThemeManager sharedThemeManager] retain];
    [[r5 getValueOfProperty:@"message_node_timeNode_height" inRuleSet:@"#message_node_view"] retain];

	UIView *timeRoot = [][UIView alloc]initWithFrame:....];

    r11 = [[MMUILabel alloc] init];
	// 这是label各种属性

	r10 = [[UIImageView alloc] init];
	// 设置ImageView各种属性
}
最终就是构成这个:
ContentNode
知道了TimeNode如何preCreate的,那ContentNode就类似了,只是代码更多。
void -[BaseMsgContentViewController preCreateMessageContentNode:](void * self, void * _cmd, void * arg2) {

messageNodeData = arg2
if(messageNodeData.m_view == nil){
	// 仍然是填充m_view

	// 判断是否自己发的消息
    r5 = [[r11 m_msgWrap] retain];
    arg_14 = [CMessageWrap isSenderFromMsgWrap:r5];

	如果是对方消息
	r0 = [r8 newMessageNodeViewForMessageWrap:r4 contact:r5 chatContact:STK-1];
	如果是我发送的消息
	r0 = [r8 newMessageNodeViewForMessageWrap:r6 contact:0x0 chatContact:STK-1];

	设置m_view

	//计算frame

	//GameNode特殊处理
	//语音特殊处理	r2 = [VoiceMessageNodeView class];

}
PS:这个方法之前的版本很长,现在的版本进行了优化。新增了newMessageNodeViewForMessageWrap方法。
void * -[BaseMsgContentViewController newMessageNodeViewForMessageWrap:contact:chatContact:](void * self, void * _cmd, void * arg2, void * arg3, void * arg4) {

	// 这里循环判断vector中的每个类,交给每个类判断是否是自己的类型
    r0 = r5->m_messageNodeClass;

	for(Class in r0){

	// 先判断能否创建
    r4 = *(r0 + r11 * 0x4);
    if (([r4 canCreateMessageNodeViewInstanceWithMessageWrap: r2] & 0xff) != 0x0) goto loc_1609718;

	// 创建
    r0 = [r4 alloc];
    r4 = arg_8;
    r6 = arg_4;
    var_0 = r6;
    r5 = [r0 initWithMessageWrap:arg_C Contact:r4 ChatContact:STK-1];

	}
}
canCreateMessageNodeViewInstanceWithMessageWrap
看下canCreateMessageNodeViewInstanceWithMessageWrap方法,
char +[BaseMessageNodeView canCreateMessageNodeViewInstanceWithMessageWrap:](void * self, void * _cmd, void * arg2) {
    return 0x0;
}
先看所有NodeView的基类 BaseMessageNodeView,默认返回0x0,也就是NO。(32位下BOOL是char,这里也就是返回个BOOL类型)
再随便找个子NodeView类,例如:MessageSysNodeView
char +[MessageSysNodeView canCreateMessageNodeViewInstanceWithMessageWrap:](void * self, void * _cmd, void * arg2) {
    r4 = [arg2 retain];
    r5 = @selector(m_uiMessageType);
    if ([r4 m_uiMessageType] == 0x2710) {
            r5 = 0x1;
    }
    else {
            r0 = [r4 m_uiMessageType];
            r5 = 0x0;
            asm{ it         eq };
            if (r0 == 0x2712) {
                    r5 = 0x1;
            }
    }
    [r4 release];
    r0 = r5;
    return r0;
}
可见。如果 m_uiMessageType(CMessageNodeData的CMessageWrap的成员)是 0x2710或0x2712,则认为是此消息类型。
再看ImageMessageNodeView:
char +[ImageMessageNodeView canCreateMessageNodeViewInstanceWithMessageWrap:](void * self, void * _cmd, void * arg2) {
    r4 = [arg2 retain];
    r5 = @selector(m_uiMessageType);
    if (([r4 m_uiMessageType] == 0x3) || ([r4 m_uiMessageType] == 0xd)) {
            r5 = 0x1;
    }
    else {
            r0 = [r4 m_uiMessageType];
            r5 = 0x0;
            asm{ it         eq };
            if (r0 == 0x27) {
                    r5 = 0x1;
            }
    }
    [r4 release];
    r0 = r5;
    return r0;
}
可知 0x3、0xd、0x27 都是图像。
还有很多消息,不一一列出了。
最后再看下 TextMessageNodeView:
char +[TextMessageNodeView canCreateMessageNodeViewInstanceWithMessageWrap:](void * self, void * _cmd, void * arg2) {
    return 0x1;
}
直接返回的YES。可见,如果所有消息都不是的话,则按照文本消息来处理。TextMessageNodeView也正好是最后一个push_back到 m_messageNodeClass中去的。
initWithMessageWrap
先看BaseMessageNodeView:
void * -[BaseMessageNodeView initWithMessageWrap:Contact:ChatContact:](void * self, void * _cmd, void * arg2, void * arg3, void * arg4) {
	省略……
再看看TextMessageNodeView 的initWithMessageWrap:Contact:ChatContact。 代码或多或少,没有什么关键代码。
就是根据CMessageWrap配置各种View的属性。
继续研究
下面想办法找到preCreate调用源。
准备工作
usbmuxd
➜  python-client python tcprelay.py -t 22:2222 1234:1234
Forwarding local port 2222 to remote port 22
Forwarding local port 1234 to remote port 1234
......
ssh
ssh root@localhost -p 2222
debugserver
everettjfs-iPhone:~ root# debugserver *:1234 -a WeChat
debugserver-@(#)PROGRAM:debugserver  PROJECT:debugserver-320.2.89
 for armv7.
Attaching to process WeChat...
Listening to port 1234 for a connection from *...
Waiting for debugger instructions for process 0.
lldb
[everettjf@e ~ ]$ lldb
(lldb) process connect connect://localhost:1234
Process 67776 stopped
* thread #1: tid = 0x214590, 0x31ef4474 libsystem_kernel.dylib`mach_msg_trap + 20, queue = 'com.apple.main-thread', stop reason = signal SIGSTOP
    frame #0: 0x31ef4474 libsystem_kernel.dylib`mach_msg_trap + 20
libsystem_kernel.dylib`mach_msg_trap:
->  0x31ef4474 <+20>: pop    {r4, r5, r6, r8}
    0x31ef4478 <+24>: bx     lr

libsystem_kernel.dylib`mach_msg_overwrite_trap:
    0x31ef447c <+0>:  mov    r12, sp
    0x31ef4480 <+4>:  push   {r4, r5, r6, r8}
找到偏移地址
(lldb) image list -o -f
[  0] 0x000e7000 /private/var/mobile/Containers/Bundle/Application/25FB096A-8122-49B5-9304-5FDB9080D9B0/WeChat.app/WeChat(0x00000000000eb000)
[  1] 0x031c7000 /Library/MobileSubstrate/MobileSubstrate.dylib(0x00000000031c7000)
看到image list -o -f后面的偏移地址:0x000e7000
历史消息
先看下聊天消息界面时默认加载的历史消息。
hopper中找到BaseMsgContentViewController::preCreateMessageContentNode: 的文件偏移地址:0x0160a444

计算出真实偏移地址(我比较喜欢拿ipython当计算器):
In [1]: hex(0x000e7000+0x0160a444)
Out[1]: '0x16f1444'
下断点:
(lldb) br s -a 0x16f1444
Breakpoint 1: where = WeChat`___lldb_unnamed_function80337$$WeChat, address = 0x016f1444
然后点击一个会话,进入消息界面。此时会命中断点。
这里既然命中断点了,顺带看一下 preCreateMessageContentNode 的参数类型:
(lldb) po $r0
<BaseMsgContentViewController: 0x17127c00>

(lldb) po (char*)$r1
"preCreateMessageContentNode:"

(lldb) po $r2
<CMessageNodeData: 0x1789bfb0>
回归正题,bt命令查看调用栈:
(lldb) bt
* thread #1: tid = 0x214590, 0x016f1444 WeChat`___lldb_unnamed_function80337$$WeChat, queue = 'com.apple.main-thread', stop reason = breakpoint 1.1
  * frame #0: 0x016f1444 WeChat`___lldb_unnamed_function80337$$WeChat
    frame #1: 0x016f2516 WeChat`___lldb_unnamed_function80343$$WeChat + 990
    frame #2: 0x016f2bfe WeChat`___lldb_unnamed_function80345$$WeChat + 590
    frame #3: 0x016f397e WeChat`___lldb_unnamed_function80355$$WeChat + 690
    frame #4: 0x01708ac0 WeChat`___lldb_unnamed_function80565$$WeChat + 1416
    frame #5: 0x26c54b8e UIKit`-[UIViewController loadViewIfRequired] + 602
    frame #6: 0x26c548fc UIKit`-[UIViewController view] + 24
    省略
可见这几个方法都是在主线程调用。frame#0就是preCreateMessageContentNode方法。frame #1就是调用preCreateMessageContentNode的方法。我们找下frame#1的方法。 从内存地址 0x016f2516 减去 偏移地址0x000e7000 就得到文件偏移地址:
In [4]: hex(0x016f2516-0x000e7000)
Out[4]: '0x160b516'
hopper 中找到这个方法:
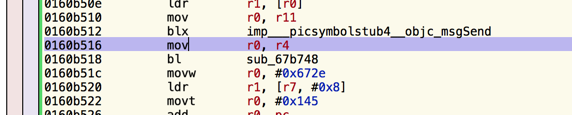
找到方法:

就是这个方法:
void -[BaseMsgContentViewController addMessageNode:layout:addMoreMsg:](void * self, void * _cmd, void * arg2, char arg3, char arg4) {
下断点到这个方法的首地址 0x16f2138 = 0x000e7000 + 0x0160b138:(先清掉之前的断点)
In [6]: hex(0x000e7000 + 0x0160b138)
Out[6]: '0x16f2138'
(lldb) br l
Current breakpoints:
1: address = WeChat[0x0160a444], locations = 1, resolved = 1, hit count = 1
  1.1: where = WeChat`___lldb_unnamed_function80337$$WeChat, address = 0x016f1444, resolved, hit count = 1
(lldb) br delete 1
1 breakpoints deleted; 0 breakpoint locations disabled.

(lldb) br s -a 0x16f2138
Breakpoint 3: where = WeChat`___lldb_unnamed_function80343$$WeChat, address = 0x016f2138
看下参数:
(lldb) po $r0
<BaseMsgContentViewController: 0x17127c00>
(lldb) po (char*)$r1
"addMessageNode:layout:addMoreMsg:"
(lldb) po $r2
{m_uiMesLocalID=384, m_ui64MesSvrID=7606243121581773106, m_nsFromUsr=wxi*h12~19, m_nsToUsr=wxi*t21~19, m_uiStatus=2, type=1, msgSource="(null)"}
(lldb) po [$r2 class]
CMessageWrap
(lldb) p $r3
(unsigned int) $13 = 0
(lldb) p $r4
(unsigned int) $14 = 40
也就是 BaseMsgContentViewController addMessageNode:layout:addMoreMsg 方法的第一个参数是 CMessageWrap,layout是0 , addMoreMsg 是40 。
同样的步骤,看下调用栈中的剩余几个方法,汇总到一起就是:
void -[BaseMsgContentViewController preCreateMessageContentNode:](void * self, void * _cmd, void * arg2) {
void -[BaseMsgContentViewController addMessageNode:layout:addMoreMsg:](void * self, void * _cmd, void * arg2, char arg3, char arg4) {
void -[BaseMsgContentViewController initHistroyMessageNodeData](void * self, void * _cmd) {
void -[BaseMsgContentViewController initData](void * self, void * _cmd) {
void -[BaseMsgContentViewController viewDidLoad](void * self, void * _cmd) {
利用hopper的反汇编看下这几个方法,我们又找到了,initView等一系列init开头的函数。比如:initTableView 中初始化tableView,并调用了reloadData。(initData在先,initView在后)
历史消息来源
仔细看
void -[BaseMsgContentViewController initHistroyMessageNodeData](void * self, void * _cmd) {
...
            arg_1C = r8;
            r0 = [r5 GetMessageArray];
            r7 = r7;
找到 [r5 GetMessageArray] 这句的汇编代码行 0x0160bb20。

断点到这行,然后输出$r0。
(lldb) br s -a 0x163db20 (这里我换了机器,重新启动了Weixin,内存偏移变为0x00032000,因此hex(0x0160BB20 + 0x00032000)=0x163db20)
(lldb) po $r0
<WeixinContentLogicController: 0x1582ad20>
(lldb) po (char*)$r1
"GetMessageArray"
(lldb) n
省略
(lldb) po $r0
<__NSArrayM 0x1584bf30>(
{m_uiMesLocalID=382, m_ui64MesSvrID=4946812604026242266, m_nsFromUsr=wxi*h12~19, m_nsToUsr=wxi*t21~19, m_uiStatus=2, type=1, msgSource="(null)"} ,
{m_uiMesLocalID=383, m_ui64MesSvrID=145730894416135475, m_nsFromUsr=wxi*h12~19, m_nsToUsr=wxi*t21~19, m_uiStatus=2, type=1, msgSource="(null)"} ,
省略
)
(lldb) po [[$r0 firstObject]class]
CMessageWrap
单步执行后,也可以看返回值$r0,也就是所有消息CMessageWrap。
可知是WeixinContentLogicController类, 看下这个类:
@interface WeixinContentLogicController : BaseMsgContentLogicController
hopper看下WeixinContentLogicController的GetMessageArray方法,发现找不到。那就是在父类BaseMsgContentLogicController中。
- BaseMsgContentLogicController GetMessageArray
内部又调用了 WeixinContentLogicController GetMsg:FromID:Limit:LeftCount:LeftUnreadCount:
- WeixinContentLogicController GetMsg:FromID:Limit:LeftCount:LeftUnreadCount:

    r0 = [MMServiceCenter defaultCenter];
    arg_30 = 0xffffffff;
    r0 = [r0 retain];
    arg_24 = r0;
    arg_30 = 0x2;
    r2 = [CMessageMgr class];
    arg_30 = 0x3;
    r0 = [arg_24 getService:r2];
    arg_30 = 0xffffffff;
    arg_28 = [r0 retain];
    [arg_24 release];
    arg_30 = 0x4;
    asm{ stm.w      sp, {r3, r5, r6} };
    r0 = [arg_28 GetMsgByCreateTime:arg_20 FromID:arg_1C FromCreateTime:STK1 Limit:STK0 LeftCount:STK-1];
大概就是 从 MMServiceCenter 获取到CMessageMgr,然后调用 CMessageMgr的GetMsgByCreateTime:arg_20 FromID:arg_1C FromCreateTime:STK1 Limit:STK0 LeftCount:STK-1 方法。
有两个方法:
- (id)GetMsgByCreateTime:(id)arg1 FromID:(unsigned long)arg2 FromCreateTime:(unsigned long)arg3 Limit:(unsigned long)arg4 LeftCount:(unsigned int *)arg5;
- (id)GetMsgByCreateTime:(id)arg1 FromID:(unsigned long)arg2 FromCreateTime:(unsigned long)arg3 Limit:(unsigned long)arg4 LeftCount:(unsigned int *)arg5 FromSequence:(unsigned long)arg6;
第一个会调用第二个带FromSequence的方法,hopper看下第二个方法:
  r0 = *objc_ivar_offset_CMessageMgr_m_oMsgDB;
    r2 = *(r7 + 0x14);
    r0 = *(r6 + r0);
    arg_C = r2;
    arg_4 = r5 + 0x5;
    r5 = *(r7 + 0x10);
    arg_8 = r5;
    var_0 = r8;
    r0 = [r0 GetMsgByCreateTime:r10 FromID:arg_24 FromCreateTime:STK2 Limit:STK1 LeftCount:STK0 FromSequence:STK-1];
    r7 = r7;
    r4 = [r0 retain];
    r1 = @selector(HandleMsgList:MsgList:);
    [r6 HandleMsgList:r2 MsgList:STK3];
objc_ivar_offset_CMessageMgr_m_oMsgDB 就是 CMessageDB *m_oMsgDB; 也就是调用了 CMessageDB的GetMsgByCreateTime:r10
PS:
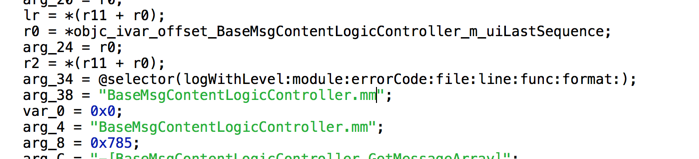
在hopper中能看到不少日志信息,而且写明了当前实现文件的文件名。 后缀是.mm,当然不止这一个,微信好多类都是Objective C++实现的。包括消息主界面的 BaseMsgContentViewController.mm,以及下面CMessageMgr中的很多类。(猜测,微信的初期开发人员不少做Windows下C++开发客户端的哈。C开头的类……)
这个CMessageMgr也是Objective C++开发 。不过hopper能看出 GetMsgByCreateTime: 内部调用了
int -[CMessageDB GetMsg:Where:order:Limit:](int arg0) {
内部又调用:
   r11 = *objc_ivar_offset_CMessageDB_m_oMMDB;
    r0 = *(r6 + r11);
    r3 = *0x26b20d8;
    asm{ stmeq.w    sp, {r4, r10} };
    arg_8 = r5;
    r5 = r8;
    r0 = [r0 GetMessagesByChatName:r5 onProperty:r3 where:STK1 order:STK0 limit:STK-1];
调用了成员CMMDB的 GetMessagesByChatName方法。
@interface CMessageDB : NSObject
{
    CMMDB *m_oMMDB;
}
CMMDB的 GetMessagesByChatName方法内部如下:
    res = [arg0 GetMessageTable:r11];
    r0 = [res getObjectsWhere:r10 onProperties:r4 orderBy:STK0 limit:STK-1];
也就是对 CMMDB::GetMessageTable 的返回值调用了getObjectsWhere方法。
void * -[CMMDB GetMessageTable:](void * self, void * _cmd, void * arg2) {
    r4 = [[CMMDB messageTableName:arg2] retain];
    r5 = [[self m_db] retain];
    r3 = [DBMessage class];
    r6 = [[r5 getTable:r4 withClass:r3] retain];
    r0 = loc_215a20c(r6, @selector(getTable:withClass:));
调用了 m_db( WCDataBase *m_db;) 的 getTable:withClass方法。再看进入 就是返回 WCDataBaseTable类型。
看看CMMDB的头文件
@interface CMMDB : NSObject <WCDataBaseEventDelegate>
{
    NSRecursiveLock *m_lockMMDB;
    NSMutableSet *m_setMessageCreatedTable;
    NSMutableSet *m_setMessageExtCreatedTable;
    OpLogDB *m_oplogWcdb;
    WCDataBase *m_db;
    WCDataBaseTable *m_tableContact;
    WCDataBaseTable *m_tableContactExt;
    WCDataBaseTable *m_tableContactMeta;
    WCDataBaseTable *m_tableQQContact;
    WCDataBaseTable *m_tableSendMsg;
    WCDataBaseTable *m_tableUploadVoice;
    WCDataBaseTable *m_tableDownloadVoice;
    WCDataBaseTable *m_tableRevokeMsg;
    WCDataBaseTable *m_tableEmoticon;
    WCDataBaseTable *m_tableEmoticonUpload;
    WCDataBaseTable *m_tableEmoticonDownload;
    WCDataBaseTable *m_tableEmoticonPackage;
    WCDataBaseTable *m_tableBottle;
    WCDataBaseTable *m_tableBottleContact;
    WCDataBaseTable *m_tableMassSendContact;
}
就是根据要获取的表类型(这里是DBMessage class)获取到对应的WCDataBaseTable实例,用来操作某个表。
PS: WCDataBase 就是对sqlite的封装了。
@interface WCDataBase : NSObject <WCDBCorruptReportInterface, WCDBHandlesPoolProtocol>
{
    WCDBHandlesPool *m_handlesPool;
    struct sqlite3 *m_dbHandle;
    NSData *m_dbEncryptKey;
    BOOL m_isMemoryOnly;
    NSString *m_nsDBPath;
    NSString *m_nsDBFilePath;
    NSString *m_nsDBName;
    NSRecursiveLock *m_oLock;
    unsigned int m_databaseID;
    unsigned int m_initTime;
    id <WCDataBaseEventDelegate> m_eventDelegate;
    WCDBCorruptReport *m_corruptReport;
}
进一步跟踪调用,会到:
int -[WCDataBase getObjectsOfClass:fromTable:onProperties:where:orderBy:limit:getError:](? arg0) {
这里就是对sqlite的本地查询了。
就到这里吧,知道了大体流程。但貌似有个问题,这一溜下来都是在主线程干的事情,不过看来足够快了。
PS:微信的本地sqlite数据库设计及Objective C++的封装有时间可以学习下。
新消息
上面找到了首次打开聊天界面时加载历史聊天消息的调用栈。
我还想知道,在会话界面时,新消息到来时的调用栈。那就进入聊天界面后,再下载断点,然后用另一个手机给这个账号发消息(自己发也行啊),然后看调用栈。
首先进入聊天消息页面,然后再次下断点到 preCreateMessageContentNode方法。
(lldb) br s -a 0x16f1444
Breakpoint 4: where = WeChat`___lldb_unnamed_function80337$$WeChat, address = 0x016f1444
(lldb) c
error: Process is running.  Use 'process interrupt' to pause execution.
Process 67776 stopped
* thread #1: tid = 0x214590, 0x016f1444 WeChat`___lldb_unnamed_function80337$$WeChat, queue = 'com.apple.main-thread', stop reason = breakpoint 4.1
    frame #0: 0x016f1444 WeChat`___lldb_unnamed_function80337$$WeChat
WeChat`___lldb_unnamed_function80337$$WeChat:
->  0x16f1444 <+0>: push   {r4, r5, r6, r7, lr}
    0x16f1446 <+2>: add    r7, sp, #0xc
    0x16f1448 <+4>: push.w {r8, r10, r11}
    0x16f144c <+8>: sub.w  r4, sp, #0x20
(lldb) bt
* thread #1: tid = 0x214590, 0x016f1444 WeChat`___lldb_unnamed_function80337$$WeChat, queue = 'com.apple.main-thread', stop reason = breakpoint 4.1
  * frame #0: 0x016f1444 WeChat`___lldb_unnamed_function80337$$WeChat
    frame #1: 0x016f2516 WeChat`___lldb_unnamed_function80343$$WeChat + 990
    frame #2: 0x018df210 WeChat`___lldb_unnamed_function87462$$WeChat + 472
    frame #3: 0x018df44e WeChat`___lldb_unnamed_function87463$$WeChat + 398
    frame #4: 0x01f6e3a2 WeChat`___lldb_unnamed_function115325$$WeChat + 1242
    frame #5: 0x2433e5ce Foundation`__NSThreadPerformPerform + 386
    frame #6: 0x235c5fae CoreFoundation`__CFRUNLOOP_IS_CALLING_OUT_TO_A_SOURCE0_PERFORM_FUNCTION__ + 14
采用上面的方法可获得调用栈:
void -[BaseMsgContentViewController preCreateMessageContentNode:](void * self, void * _cmd, void * arg2) {
void -[BaseMsgContentViewController addMessageNode:layout:addMoreMsg:](void * self, void * _cmd, void * arg2, char arg3, char arg4) {
void -[BaseMsgContentLogicController DidAddMsg:](void * self, void * _cmd, void * arg2) {
void -[BaseMsgContentLogicController OnAddMsg:MsgWrap:](void * self, void * _cmd, void * arg2, void * arg3) {
void -[CMessageMgr MainThreadNotifyToExt:](void * self, void * _cmd, void * arg2) {
__NSThreadPerformPerform
__CFRUNLOOP_IS_CALLING_OUT_TO_A_SOURCE0_PERFORM_FUNCTION__
根据调用栈,大体得知 CMessageMgr MainThreadNotifyToExt 分发出消息。又到了CMessageMgr类。
上一个方法是__NSThreadPerformPerform,可知是从其他线程使用perform过来的。(perform到主线程会加入到主线程的RunLoop中)
看看MainThreadNotifyToExt的参数。断点到第一行代码:

lldb查看:
(lldb) po $r0
po<CMessageMgr: 0x147afbe0>

(lldb) po $r0
<CMessageMgr: 0x147afbe0>

(lldb) po (char*)$r1
"MainThreadNotifyToExt:"

(lldb) po $r2
{
    1 = 1;
    2 = "wxid_pamzqdzakikt21";
    3 = "{m_uiMesLocalID=394, m_ui64MesSvrID=8508546064571928607, m_nsFromUsr=wxi*t21~19, m_nsToUsr=wxi*h12~19, m_uiStatus=3, type=1, msgSource=\"\"} ";
}

(lldb) po [$r2 class]
__NSDictionaryM
(lldb) po [[$r2 objectForKey:@"3"] class]
CMessageWrap

(lldb) po [[$r2 objectForKey:@"2"] class]
__NSCFString

(lldb) po [[$r2 objectForKey:@"1"] class]
__NSCFString
可知参数是个NSDictionary,key分别为字符串1 2 3,分别是 NSString NSString 以及CMessageWrap。
可知CMessageWrap是后台线程准备好的。
hopper能能看到大体流程:
center = [MMServiceCenter defaultCenter]
service = getService:[MMExtensionCenter class]
IMsgExt ext = service getExtension:[IMsgExt class]
然后使用IMsgExt分发消息。
IMsgExt协议如下:
@protocol IMsgExt

@optional
- (void)OnAddMsg:(NSString *)arg1 MsgWrap:(CMessageWrap *)arg2;
- (void)OnAddMsgForSpecialSession:(NSString *)arg1 MsgList:(NSArray *)arg2;
- (void)OnAddMsgListForSession:(NSDictionary *)arg1 NotifyUsrName:(NSSet *)arg2;
- (void)OnBeginDownloadAppData:(CMessageWrap *)arg1;
- (void)OnBeginDownloadImage:(CMessageWrap *)arg1;
- (void)OnBeginDownloadVideo:(CMessageWrap *)arg1;
- (void)OnChangeMsg:(NSString *)arg1 OpCode:(unsigned long)arg2;
- (void)OnDelMsg:(NSString *)arg1;
- (void)OnDelMsg:(NSString *)arg1 DelAll:(BOOL)arg2;
- (void)OnDelMsg:(NSString *)arg1 MsgWrap:(CMessageWrap *)arg2;
- (void)OnGetNewXmlMsg:(NSString *)arg1 Type:(NSString *)arg2 MsgWrap:(CMessageWrap *)arg3;
- (void)OnModMsg:(NSString *)arg1 MsgWrap:(CMessageWrap *)arg2;
- (void)OnMsgDownloadAppAttachExpiredFail:(NSString *)arg1 MsgWrap:(CMessageWrap *)arg2;
- (void)OnMsgDownloadThumbFail:(NSString *)arg1 MsgWrap:(CMessageWrap *)arg2;
- (void)OnMsgDownloadThumbOK:(NSString *)arg1 MsgWrap:(CMessageWrap *)arg2;
- (void)OnMsgDownloadVideoExpiredFail:(NSString *)arg1 MsgWrap:(CMessageWrap *)arg2;
- (void)OnMsgNotAddDBNotify:(NSString *)arg1 MsgWrap:(CMessageWrap *)arg2;
- (void)OnMsgNotAddDBSession:(NSString *)arg1 MsgList:(NSArray *)arg2;
- (void)OnPreAddMsg:(NSString *)arg1 MsgWrap:(CMessageWrap *)arg2;
- (void)OnReceiveSight:(CMessageWrap *)arg1;
- (void)OnRevokeMsg:(NSString *)arg1 MsgWrap:(CMessageWrap *)arg2 ResultCode:(unsigned long)arg3 ResultMsg:(NSString *)arg4 EducationMsg:(NSString *)arg5;
- (void)OnSendSight:(NSString *)arg1;
- (void)OnShowPush:(CMessageWrap *)arg1;
- (void)OnUnReadCountChange:(NSString *)arg1;
- (void)OnUpdateVideoStatus:(NSString *)arg1 MsgWrap:(CMessageWrap *)arg2;
@end
具体细节就不继续分析了。大体知道了与UI相关的流程。
其他
内存占用
微信这种把消息的view 预创建到实体中,且不销毁。不销毁的意思是:退出界面会话时不会销毁;不断的下拉消息会不断的创建。一眼感觉不太考虑,看看微信内存占用情况。
首先,把微信进程结束后,重新打开。
在这种状态下看看内存:
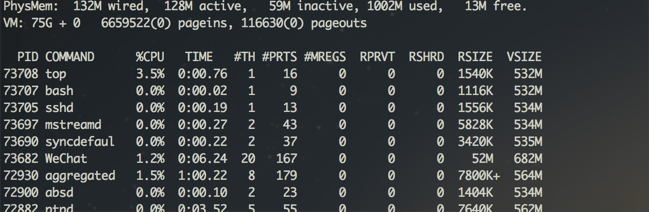
RSIZE=52M
然后,进入聊天界面:
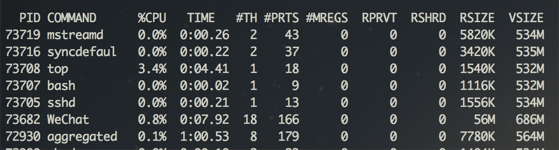
RSIZE=56M
然后,使劲发消息(图片、文字各种消息),400多条,全部下拉下来。
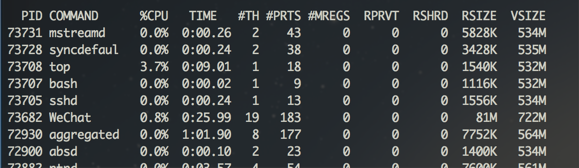
RSIZE=81M
这样看来,由于在一个会话中打开很多消息的概率较少,且内存占用还是可接受的。占用81M感觉还是比较少的。看来这种方案还是比较靠谱的。
这种方案也有性能上的优势,就是不需要重复设置消息View的内容(因为preCreate了嘛),牺牲了内存,提高了性能。
ViewController
微信会对ViewController进行缓存,也就是对同一个用户的消息打开两次,ViewController的地址是相同的。
应该会有个缓存策略,有空研究研究。
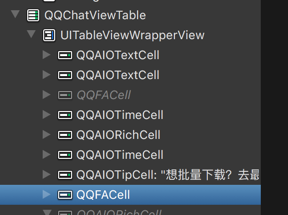
QQ等其他实现方案
要支持IM界面的多种类型消息展示,首先想到的肯定是使用多种Cell。例如:TextCell, ImageCell 等。经典的QQ,其实就是这种方式。可以用Reveal看看。
cellForRowAtIndexPath中改变frame的问题
如果采用QQ这种使用Cell的方案,有个UI上的细节问题要注意。见这篇文章。
Demo
根据微信上面的消息界面实现,我实现了一个很简单的类似机制的界面Demo https://github.com/everettjf/Yolo/tree/master/WeChatLikeMessageDemo 。
实现过程中发现这种机制有个好处,就是在preCreate消息时,可以提前(在heightForRowAtIndexPath之前)知道cell的高度,也就很方便的解决了Cell动态高度这个问题。
总结
逆向可以让我们了解一个App的实现方法(尤其是优秀未开源的App哈),学习这些优秀的App可以辅助正向开发。
推荐《iOS应用逆向工程》这本书,以及 http://iosre.com 论坛。